Manifest Technology Blog
-- Site:
| Articles
| Galleries
| Resources
| DVI Tech
| About
| Site Map
|
Articles:
| PC Video
| Web Media
| DVD & CD
| Portable Media
| Digital Imaging
| Wireless Media
| Home Media
| Tech & Society
|
PC Video: |
PC Video Articles |
Video Software Gallery |
Video Editing Resources |
Basic Video Editing and DVD Authoring
with Ulead VideoStudio 10 (1/2007)
by Douglas Dixon
Ulead VideoStudio 10
Even Easier Editing
Editing Step-by-Step
-
Capture
-
Effects
-
Overlay
-
Titles
-
Audio
-
Sharing Formats
- DV to DVD
References
Ready to get started with video editing? Maybe you've some
video that you'd like to make into a nice little movie production, complete with
transitions between scenes, background music, title text, and some fun video
effects. And you can share your movies as video files for computer playback, or
post for friends to view over the Web, or download to a iPod to take with you,
or even burn on DVD to watch in the living room.

It's easier than ever to create good-looking productions
with these kinds of features, thanks to the latest generation of consumer video
editing software, like Apple's iMovie and iDVD, and Windows-based applications
including Adobe Premiere Elements, Pinnacle Studio, Roxio Easy Media Creator,
Sony Vegas Movie Studio, and Ulead VideoStudio -- and available for only around
$49 to $99.
So let's walk though the video editing and DVD authoring
process, using Ulead VideoStudio 10
to demonstrate some of the latest capabilities in these applications (www.ulead.com/vs).
VideoStudio uses a nice step-by-step approach in its interface, which makes it
easy for beginners (and occasional users) to figure out what to do and how to do
it.
VideoStudio version 10 was released in April 2006 in two
versions: the base VideoStudio 10 for $69.99 (list), and the full VideoStudio 10
Plus for $99.99. The Plus version, which we'll cover here, adds support for
higher quality formats with high-definition video, Dolby Digital 5.1 surround
sound, and MPEG-4 support (also for portable players).
VideoStudio is focused on making editing straightforward
and easy, with an approachable interface, accessible controls, and text prompts.
But there are times you want it even easier -- to just quickly assemble a group
of clips into a movie or DVD. So the start screen for VideoStudio offers three
options: run the full VideoStudio Editor, or quickly assemble a movie with the
Movie Wizard, or directly transfer a videotape to disc with the DV-to-DVD
Wizard.
 Start Screen
The DV-to-DVD Wizard
is for getting your videotape transferred to disc with a minimum of fuss -- so
it's convenient to view and easy to share. Hook up your DV camcorder to your
computer (i.e., with a FireWire cable). Then simply specify the length of the
tape and choose a menu design template, and VideoStudio will do the rest:
rolling the tape, capturing the video, compressing to DVD format, and burning it
to disc. You also can use automatic scene detection (based on the times you shot
each clip) to split the tape into separate chapters.
For more control, you can use the DV Quick Scan feature to zip though your tape and display the scenes
-- so you can choose whether to include them on the disc. You also can save
these DV tape scene digests for future use, and print them as a handy reference
for the contents of your tapes.
The Movie Wizard
is designed for quickly assembling a list of clips to make into a movie. You can
insert video and image files from hard disk, capture video from tape, and import
from DVDs or mobile devices. Then choose a theme template, with a title,
background music, and nice fades/transitions between clips. Finally, save the
result: export as a video file, burn to disc, or send to the VideoStudio Editor
for further editing.
 Movie Wizard
VideoStudio can help scan your clips to find poorly shot
scenes, or use the Ad-Zapper to automatically detect commercials. You can split
scenes, and trim and delete them as desired.
But for more editing control, the main VideoStudio Editor has a full-screen user interface, with tabs for
each editing step along the top of the main window. The interface has three main
areas: the Library of clips and other elements on the right, the large Preview
window on the left, and the Storyboard / Timeline for assembling clips along the
bottom (you also now can switch between several alternate layouts).
You can start creating your movie by importing clips under
the Edit tab.
 Edit
Edit
The Library not only provides access to pre-supplied
editing elements (including Colors, Transitions, Video Filters, Titles,
Decorations, and Animations), but you also can use it to import and organize
your own media clips -- Video, Audio, and Image. Just click the Add button, or
drag and drop files from Windows Explorer.
Then use the Preview window to view your clips, or the
production you are building in the Storyboard / Timeline.
VideoStudio provides a Storyboard
view for quickly assembling a list of clips. Like the Movie Wizard, you can use
the Storyboard to quickly drag and drop to build a collection of clips. You then
can save the result, or move on to perform more editing under the various tabs.
The multi-track Timeline
provides more control for laying out a series of clips, and then adding Overlay
and Title text to the video, and mixing Voice recordings and Music tracks with
the audio. You can drag clips in the Timeline to adjust, trim, and split them,
and to sync them with other tracks.
But the big news in new consumer video editors is support
for high-quality media. VideoStudio now can work with HD video and Dolby Digital
5.1 sound. To handle the big HD files, even if you don't have the
highest-performance machine, VideoStudio uses a Smart Proxy technique. You edit
with lower-res versions of your clips, and then the final production is created
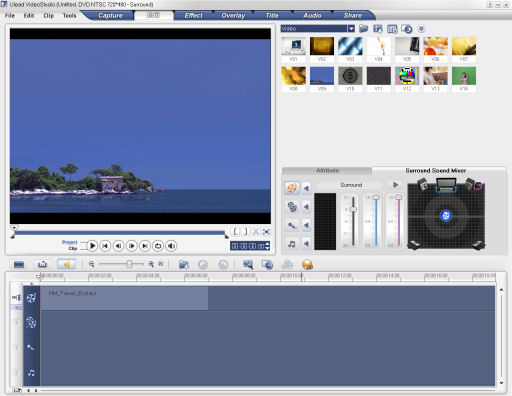
by going back to the HD originals. VideoStudio even has a Surround Sound Mixer
to steer and pan sound channels between the 6 speakers.
To bring in more
clips to edit in VideoStudio,
use the Capture tab to capture video
from a camcorder, or to import from a DVD or mobile device.
When capturing
video, as with the DV-to-DVD Wizard, you can use DV Quick Scan to split the tape
into scenes (based on the time when you shot each segment), preview the scenes
as a collection of thumbnails, and then decide which ones to capture.
VideoStudio now supports high-definition video and the new
HDV camcorders, so you now can capture from devices including a DV and DVD
camcorder, VCR, Webcam, set-top DVD recorder, TV tuner, Digital TV, or HDTV.
If you already have some material on DVD that you would
like to re-use, VideoStudio can extract tracks from a DVD or DVD-VR (from a
set-top DVD recorder) -- but not from copy-protected commercial DVDs.
And it can interface to portable media players and other
external devices, to list and copy video and image files.
One you've
imported and captured all your clips and assembled the basic flow of your movie
in the Storyboard / Timeline, it's time to move on to enhancing your
production with effects and overlays.
Use the VideoStudio Effect
tab to first add transitions between your clips so they do not cut abruptly from
one to the next. Try conventional Wipes and Slides, or have fun with more
dramatic Film and 3D transitions, even with mask patterns.
Next, apply video filters to correct and enhance the video,
much the same way we now enhance and get creative with photos. Use Auto Exposure
and Auto Level to clean up the tone and brightness, or Anti-Shake, Enhance
Lighting, or DeNoise to correct problem clips. Then have fun with the more
creative filters, to add Strobe or Ghost Motion, or Clouds, Rain, Wind, or
Lightning look.
 Video FIlters
You also can adjust the playback speed to slow or fast
motion, without altering the pitch of the audio. Or use reverse playback to play
the video backwards.
Once your main
video production is in good shape, you can add additional elements in the VideoStudio
overlay tracks.
Use the Overlay
tab to size and position additional clips in the frame for picture-in-picture
and montage effects. Add motion to have the overlays fly and spin over the
frame, with up to six overlay tracks.
Use Chroma Key to have video shot against a green-screen
(or other flat color) background superimposed on the main video. Ulead even
offers a handy blue Chroma-Key Cloth for $14.99 for shooting blue-screen
productions, 2 x 1.6 meters square.
VideoStudio also supports Flash animation overlays using
Macromedia Flash moving objects or clips. For example, the built-in animations
include clapping hands, floating bubbles, and a beating heart.
Just as with clips, you can move overlaid objects in the
Timeline to synchronize their timing with the other tracks.
Also use the Title
tab to add text overlays to the clip. Type the text and adjust its position and
size, or use the pre-defined style templates.
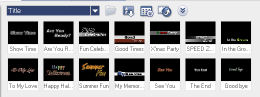 Title styles
Apply text backdrops with
color gradients and transparency. Animate the titles to have the characters fly
into position. VideoStudio even supports multiple titles that appear and move
independently.
After all that
work on the video, move on to the Audio
tab to add and mix additional audio tracks, and to apply audio enhancement
filters.
Within VideoStudio,
you can import additional material from Audio CDs, and record your own voice
tracks using your sound card and a microphone.
As with video, you
then can adjust the playback speed, and apply audio filters to enhance the sound
-- level the volume, remove noise, or even shift the pitch (with a nice preview
as you adjust the options).
Then mix the
tracks together in the Audio View to see the actual audio waveforms in the
tracks, adjusting the stereo (or surround-sound) balance between the tracks. You
also can precisely adjust sound levels within the tracks using
rubber-band lines.
VideoStudio also
includes the SmartSound Auto Music
Maker to create royalty-free music compositions in your selected style and
variation, and adjusted to exactly fit the duration of your project.
When you're done
editing, it's time to save and share your project, in an almost bewildering
variety of formats.
Click the Share
tab in VideoStudio to build your final movie production and choose how and where
to save it. You can export as a disk file or to the Web or to a mobile device --
or burn a disc, or record to tape. In addition, you can take any Library clip
and use it for a creative project -- output as a Web page, via E-mail, as
a greeting card, or as a movie screen saver.
The most direct export option is Create Video File -- saving your movie on hard disk, typically in a
compressed video format. Similarly, use
Create Sound File to export an
audio-only file in a variety of formats.
For full
TV-resolution video playback (720x480 for NTSC), VideoStudio can export in DV or DVD formats -- either 4x3 standard
aspect ratio or 16x9 widescreen, and stereo or Dolby Digital 5.1 surround sound
on DVD. And it can export in compatible
MPEG-2 and MPEG-1 formats for VideoCD (VCD) and Super VideoCD (SVCD).
For computer-based
and Web playback, you can export in Windows Media Video (WMV), Apple
QuickTime, and RealNetworks RealVideo formats, each with a variety of options
for compression type, resolution, frame rate, and therefore size and data rate.
For Web video, you also can use the Share
Video Online presets for WMV (640x480, 30 fps, to 160x120, 15 fps).
Plus, there are
presets for MPEG-2 HD and WMV HD
for new high-def videos (1280x720, 1440x1080), and a range of MPEG-4 and
WMV presets for low-res portable devices.
For specific
portable devices, use the Export to
Mobile Device presets to choose the appropriate format, resolution, and
frame rate for the devices (i.e., 320x240, 15 fps and lower),
including WMV for PocketPC and Smartphones, and MPEG-4 for the iPod, PSP, PDAs/
PMP (Personal Media Player), and Mobile Phones.
To move your movie back to the living room, use the DV
Recording option to transfer back to a DV camcorder, or Project
Playback to play full-screen out to a recorder (i.e., through your DV
camcorder's video output).
Finally, you can burn your project to DVD. VideoStudio
actually contains significant portions of Ulead's DVD MovieFactory application, so the Create Disc tool actually is a mini DVD authoring tool. You can
assemble clips (import files and VideoStudio projects, import from DVD or mobile
devices), add and edit chapter points (which also can be set in the VideoStudio
Editor Timeline), select a menu design template, customize with menu effects,
and then burn the result.
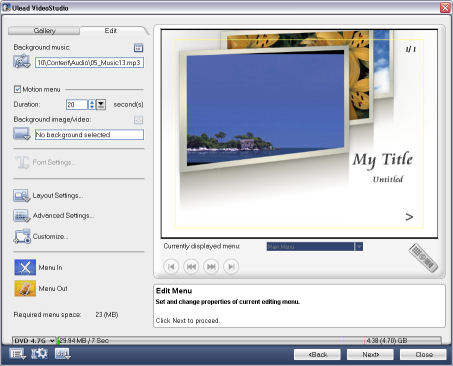 DVD creation
VideoStudio 10 also adds some cool DVD menu options,
including menu filters to animate static menus with ripples, waves and
pan/zooms; menu transitions to segue smoothly between menus and DVD content; and
SmartScene menus where the project titles share a single preview area, rather
than appearing as separate motion buttons.
As you can see with Ulead's VideoStudio 10, the process of
getting from DV to DVD is getting both easier and more creative. For quick
viewing, you can transfer a tape directly to DVD, or assemble a list of clips
into a single movie. And these can look quite snazzy, with pre-built design
templates and default transitions and slideshow effects.
But with a little more effort you can go a lot further,
enhancing the video and audio quality, adding dynamic overlays and flying text,
and mixing background music and voice-overs from multiple audio tracks.
And we're not just talking standard-definition video:
VideoStudio also supports widescreen format (very nice for DVD), the new
high-definition formats, and amazingly Dolby Digital 5.1 surround sound.
So if you've got video on tapes, this is a great time to do
something interesting with it. Try extracting some clips to play on your
computer, or transfer from tape to DVD so you can share your fun. You then can
get more creative in making a movie.
You can download trial versions of VideoStudio and similar
applications over the Web, so go ahead and give it a try.
Ulead VideoStudio
10
www.ulead.com/vs
Originally published in Camcorder & Computer
Video magazine, Buyer's Guide 2007.
|