|
|
Manifest Technology Making Sense of Digital Media Technology By Douglas Dixon |
|
|
Articles: | PC Video | Web Media | DVD & CD | Portable Media | Digital Imaging | Wireless Media | Home Media | Tech & Society | DVD & CD: | DVD & CD Articles | DVD Software Gallery | High-Def DVD Gallery | DVD Authoring Resources | Cracking the Disc: Re-Editing your DVDs (5/2003)
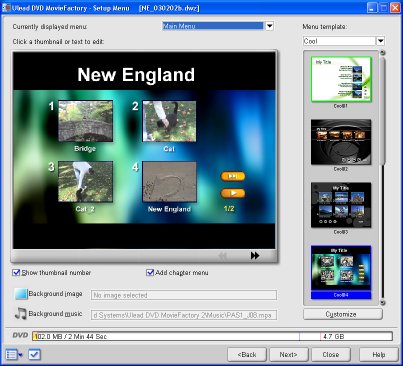
See the DVD Authoring Software Gallery for information on software products Until now, DVD authoring has been a write-only process: you assemble your video clips and other assets, lay them out in DVD menus, and then the authoring tool converts them into DVD format and burns the result to a disc. But what if you then want to add another clip to the disc, or, even worse, find a typo in one of the menus? Should you really archive every project, along with all its assets, in order to keep open the possibility of re-authoring a disc? After all, the final disc contains all the elements of the project, including the menu text and graphics, the navigational flow, and, of course, all the video and audio clips. Why not just edit the contents of the disc directly, as you can do with a word processing document? This is the thinking behind the new generation of DVD authoring tools, like MedioStream neoDVD and Sonic MyDVD, that allow you to re-edit existing DVDs. While all the individual assets of your project are multiplexed together into large files during the authoring process, these new authoring tools let you get back to the individual assets by adding additional project information to the disc. You then can open the disc in the authoring tool just like a project file on hard disk. And with ReWritable (RW) discs, these tools even allow you to edit the contents of a disc in place. The new version 2 of Ulead's DVD Movie Factory (www.ulead.com/dmf) goes a step further, allowing you also to import the contents of any home-produced disc, even without the additional project information. This, and other new features like support for adding other data files to your discs, makes DVD Movie Factory 2 a comprehensive yet easy to use tool for a wide range of DVD authoring activities. You can convert tapes direct to DVD like a set-top video recorder, or edit a group of videos and photos into customized menus, and now even re-edit existing DVDs to add new elements. In this article, we'll take a tour of the DVD authoring process with DVD Movie Factory, and focus on how these tools are supporting re-editing editing discs. We'll also highlight the key issue in speeding up the authoring process: real-time video compression into the MPEG format used for DVD. Re-Editing DiscsThe need to re-edit existing discs was driven by set-top DVD recorders, which must be capable of not only recording clips like a VCR, but also adding menus, and even editing the contents of a disc (for rewritable formats). As a result, the DVD-Video format was augmented for DVD recorders into the Video Recording (VR) format, which adds additional control information to the disc to manage the layout of the clips on the disc. Set-top recorders now typically offer the option to record in VR format for greater editability (typically for ReWritable RW discs), or in standard DVD-Video format (typically for Recordable R write-once discs). The VR format is less compatible with older players (as are RW discs), but these issues are being resolved with newer DVD players. Once the VR format was established, it became possible to also use it for cross-compatibility between set-top and desktop DVD. You can not just play set-top DVDs on a computer, but actually edit DVDs both on a TV and on a PC. For example, MedioStream neoDVD (www.mediostream.com) supports the VR format in this way: you can record on the set-top and then open the disc on your computer to edit it further, or vice versa. Ulead DVD Movie Factory 2 uses the same approach, in what it calls "fast editable" format. Sonic Solutions has taken another course with MyDVD (www.mydvd.com) and its other DVD products. Sonic defined its own OpenDVD format for saving project information on disc, so DVD discs can be re-edited, and even edited directly on the disc. This approach of saving project information on DVDs works great when you want to re-edit a disc that you created with a compatible tool, but what about other discs that do not have this additional information? You can use separate demultiplexor tools to extract the video and audio data from the files on a DVD disc (i.e., from VOB files in the VIDEO_TS folder). DVD Movie Factory 2 has this function built in: the Import DVD Video option will import the contents of an existing DVD (on disc or on hard disk) as a new clip in your project. This can be a long clip; you then can trim and extract the portions of the clip that you want to use. Of course, this is designed to work with desktop productions, and not copy-protected commercial discs. On-Disc EditingThe next detail with re-editing discs is how to manage the project and its assets. If the original project was recorded to a read-only Recordable R disc, then the disc's contents need to be copied back to your hard drive in order to edit the project and then burn a new disc. This copy can take a long time for a full 4.7 disc. But if the project was recorded to a ReWritable RW disc, then it is possible to edit the contents of the disc in place, without the copy to hard disc. When you edit on disc, however, updates to your project can be much slower, since they are performed at the DVD access rate and not at the accustomed speed of your local hard disc. You also need to be careful about how you work with your rewritable DVDs, since you now have the ability to unintentionally clobber your master discs when they are in writable formats. You may want to think about making a permanent copy of your productions on Recordable disc, and then also making an editable copy on ReWritable disc. You can do this by doing a disc to disc copy from the master disc, or by creating your DVD production on hard disk, and then burning multiple copies to DVD discs. Direct to Disc RecordingDVD MovieFactory 2 uses a wizard-like interface to step though the DVD creation process. First, you choose what you want to do: Start a new project, Edit an existing project or disc, Copy a disc, or capture Direct to Disc. The options for each task are listed in the center of the window, with summary information provided at the bottom. The Direct to Disc option provides one-step authoring, operating much like a set-top DVD recorder. You choose a menu template style and feed in an input video, and DVD MovieFactory does the rest: capture the video, create the menus complete with thumbnails, convert and compress to DVD format, and then burn the final disc. The first step in Direct to Disc recording (or in starting a new project) is to choose the output format: DVD, VideoCD (VCD), or Super VideoCD (SVCD). This is important for several reasons: it determines the available size of the output disc (DVD or CD), the menu and navigational formats (VCDs are much simpler), and the compression format for the input video (full MPEG-2 for DVD, reduced-resolution MPEG-2 for SVCD, or lower-resolution MPEG-1 for VCD). With Direct to Disc recording, DVD MovieFactory 2 performs real-time compression to DVD-compatible MPEG format. Ulead recommends at least an Intel Pentium III 450 MHz, but even on lower-end machines with a DV camcorder controlled over a FireWire / 1394 interface, it can pause the camcorder temporarily in order to finish compressing each section of video. Creating DVD ProjectsYou also can use DVD MovieFactory to create and edit projects created from clips on your hard disk. The DVD MovieFactory Add/Edit Media Clip window then steps you through process of assembling your clips: capturing and adding clips, editing the clips, and adding chapter points. Use Capture Video to capture video from analog or digital sources, depending on your hardware. For DV camcorders, you can use the play controls to position the tape at the starting point of the clip you want to capture. DVD MovieFactory will automatically set the format of the captured video to match your project (DVD, SVCD, or VCD). Or you can explicitly set the input capture settings, capture format (MPEG, AVI, or DV), and associated settings (such as MPEG bitrate). Use Add Video to import video clips already stored in files on your hard disk. DVD MovieFactory can import clips in AVI, QuickTime, MPEG-1 and MPEG-2 formats. Use Add Slideshow to create a slide show from a series of image or photo files stored on hard disk. DVD MovieFactory provides a nice file browser with a thumbnail viewer to review your files, as well as tools for rotating images and rearranging their order. You also can enter descriptive text, and select an audio track to play as background music. Then preview the show, and fine-tune the duration that each clip is shown. Use Import DVD Video to extract the video from an existing DVD (i.e., a disc without additional project information). DVD MovieFactory displays a thumbnail of the disc contents. It them provides a Trim window with play controls to play or search through the video and to select the In and Out points of a clip to import. The Trim window even displays markers for each chapter point (although you can jump directly to them), and the clips are split by chapters in the project when they are imported. Again, copying all the video (and audio) from a DVD to your computer can take some time, so only import the clips you need. Editing DVD ProjectsEven after you add more clips and slideshows to your project, you also can go back and edit them. To Trim a clip, simply click the thumbnail to display the clip in the video window, and then use the play controls to adjust the In and Out points. If you have Ulead VideoStudio installed, you can use Edit Video to launch VideoStudio to perform more extensive edits. Use Edit Slideshow to re-display the Add/Edit Slideshow window so you can add, delete, and rearrange the images and background audio. Use Extract Video to select multiple sections from a clip to use in your project. You can then set multiple In and Out points to select only certain section within the larger clip. Use Replace Audio to replace the audio portion of a clip with another file, typically for background music. Finally, use Split Video to break a clip at the current Jog Bar position and divide it into separate clips and thumbnails in the project. Note that all these editing operations on your video clips are not changing the original clips; they are just changing which parts of the clips are used in your project. When you click on a clip thumbnail, DVD MovieFactory still displays the context of the entire clip in the video window, with the current In and Out points of the selected sections. You can use the play controls to play through the entire original clip and adjust the trim settings, or press Shift and click Play to preview only the selected sections. Creating Chapters and MenusSome DVD authoring tools start with the menus, so that you build the project by adding clips to a menu, and then add additional menus and sub-menus if needed. In DVD MovieFactory, you first assemble and edit all your clips and slideshows, and then lay them out into menus. You also can select additional chapter points within each video clip. Use Add/Edit Chapter to select a clip and then specify points within the clip that will be used as new chapters on the disc. You then can use the Next / Previous Chapter button on the DVD remote control to skip directly to each chapter. The chapter points also can appear as additional thumbnail menu buttons on the DVD menu so you can jump directly to a chapter of interest. When you are done editing, click Next to move on to create the menus. Actually, DVD MovieFactory also offers the option to create a disc with no menus, just video. You also can specify that the first clip on the disc be used as the "first play" video, to be played as an introduction when the disc is first started, before the menus are displayed. The Setup Menu window automatically lays out your clips into one or more menus, linked by Next and Back buttons. Each clip (or slide show) is represented by a thumbnail image, with text (the clip name) underneath. You can click the thumbnail to choose a different frame to use for the thumbnail, or click the menu or thumbnail titles to edit the text. You can also choose to show the number of each thumbnail. DVD MovieFactory also offers a global option to create sub-menus for each clip that has chapter points (although you cannot tell from the menu whether a thumbnail is for a clip, a slide show, and or for a sub-menu). You can select the overall design of the menus from a gallery of design templates supplied with DVD MovieFactory. These control the background graphics, thumbnail layouts, and text fonts. Or you can even customize your own templates. You also can customize the background image and music for the menus, for an individual menu, for all menus associated with an individual clip, or for all menus. When you have finished your menu design, move on to the Preview screen to try out the navigation. DVD MovieFactory displays a virtual DVD remote control so you can play through the disc, checking the menus and clips. Output Your DVDFinally, move on to the Finish screen to output your project. You can burn directly to disc, in DVD-Video or "fast editable" (VR) format. You also can optionally save DVD folders on hard disk (for viewing and testing with a DVD player) and create a disc image file (to burn later). DVD MovieFactory also provides the options to include project files on disc (to edit later), add your own data files to the disc (to read on a computer), and to archive the image files from your slide shows on the disc. The DVD MovieFactory project settings provide control over how your clips are converted and compressed to MPEG format. You can choose different quality levels to squeeze more play time on to the disc (from 60 minutes to 6 hours at reduced resolution). You also can control the action the player takes when each clip plays to the end: repeat, continue to the next clip, or jump back to the menu. Automated DVD AuthoringDVD MovieFactory 2 provides a convenient interface for sophisticated DVD authoring, including building nested menus, creating chapters, and editing existing discs. It strikes a nice balance of providing automated functions while still opening up access to more customized designs, navigation, and compression quality. Of course, with all the possible flexibility of DVDs, there are always more capabilities that would be nice to have, such as motion menus and the ability to control the end navigation for individual clips. In particular, DVD MovieFactory provides access to (and information about) lots of low-level details about the video and audio capture and compression options on your system, and deep control over MPEG options, including video frame rate, resolution, and data rate, plus audio format and bit rate. It also has a good Help file, plus useful short explanations as pop-up tool tops. You can try out DVD MovieFactory 2 by downloading the trial version from the Ulead website (38 MB), or order a CD with trial version of all the Ulead applications. DVD MovieFactory 2 was available for download from Ulead in December 2002 for $44.99, or $34.95 for an upgrade. The retail box version is priced at $49.95 (MSRP), or $39.95 for the upgrade. With DVD MovieFactory 2 we are seeing the next step in personal DVD authoring tools: making a DVD work like a word processing document, as a work in progress that you can go back to and easily change and update. Just remember to back up the good discs before you go back and re-edit them! ReferencesMedioStream - neoDVD Sonic Solutions - MyDVD Adaptec - MyDVD Video Suite Ulead Systems - DVD MovieFactory
|
|
 Ulead DVD Movie Factory 2