Manifest Technology Blog
-- Site:
| Articles
| Galleries
| Resources
| DVI Tech
| About
| Site Map
|
Articles:
| PC Video
| Web Media
| DVD & CD
| Portable Media
| Digital Imaging
| Wireless Media
| Home Media
| Tech & Society
|
PC Video: |
PC Video Articles |
Video Software Gallery |
Video Editing Resources |
Getting Started with Streaming Flash Videos
Posting and Sharing on YouTube (2/2008)
by Douglas Dixon
Steps to Streaming
Easy Streaming: YouTube Uploading
Easy Streaming: YouTube Sharing
Make Your Own Flash Video
Design Your Own Flash Pages
Hot Flash Sharing
See also: Flash Video: Downloading from
YouTube and Converting Video Files
Web streaming media was a hot topic five years ago, but getting your videos
on the Internet turned out to be a messy business -- with the confusion of
dueling formats and their required media players (QuickTime, Windows Media,
RealNetworks), the complexity of compression to low Web bandwidths, and the
daunting logistics of hosting streaming content.
 But
streaming is back, and really hot, as today's broadband connections and access
to digital video tools has exploded interest in video sharing through sites like
YouTube. Meanwhile, the three-way format battle has been resolved in
favor of a fourth dark horse -- the Adobe Flash format (originally
Macromedia). The ubiquity of Flash (more than 95 percent of Web users have the
Flash player) allows no-fuss video playback directly in the browser, right on
the Web page. But
streaming is back, and really hot, as today's broadband connections and access
to digital video tools has exploded interest in video sharing through sites like
YouTube. Meanwhile, the three-way format battle has been resolved in
favor of a fourth dark horse -- the Adobe Flash format (originally
Macromedia). The ubiquity of Flash (more than 95 percent of Web users have the
Flash player) allows no-fuss video playback directly in the browser, right on
the Web page.
So how do you take advantage of this new opportunity to post and share your
own videos? We'll walk though getting started with using streaming Flash video,
from posting to YouTube to customizing your own site with video clips.
You can get started with sharing streaming video amazingly easily by just
posting your clips on YouTube (as the most obvious example, the process works
similarly on other such sites). Just trim and edit the clip as desired, and
upload to the site -- YouTube even takes care of converting the video to the
proper format. Another benefit is that YouTube carries the cost of hosting the
clip, including the storage and bandwidth costs, and maintains the Flash
streaming server to deliver it quickly around the globe.
 YouTube - Customized Player
Once your video is posted to YouTube, you can share it by posting or
e-mailing the link (URL) -- people can then click to go to the YouTube site to
play the video. Even better, with a little bit of HTML magic, you can embed the
Flash video player in your own Web pages, and have visitors actually play the
video while remaining on your own Web site.
Of course, using free third-party sites does involve a loss of control over
your own content. The clip is open and shared -- you can tell your family and
friends about it, and anyone else anywhere in the world can also view your
personal movies. In addition, the site may reject the clip, for example if it is
too long, or can remove it at any time if someone complains about it. There's
also the issue of ownership -- the terms and conditions transfers significant
rights to the site when you upload. The site then can do anything they want with
your video, including licensing it to others and selling advertising to profit
from your work. But certainly if you're just having fun, or want to make a name
for yourself, these free hosting sites can be a great deal.
The next step is to take more control over the presentation of your videos by
customizing how it is embedded in your own Web pages, and by compressing the
video yourself. Sites like YouTube perform a default compression process,
whereas you can customize the options to help your specific material look
better. YouTube even uses an older version of Flash video format in order to be
compatible with older players, but you may be willing to move up to the new
format for your target audience.
And you can host the video on your own site, or on a commercial site with a
defined quality of service to ensure it's available when people (like potential
clients or customers) want to see it. You can actually stream Flash video from a
regular Web server (i.e., where your website is hosted), but it's more efficient
to host the video on a separate dedicated streaming server.
Getting your videos on YouTube is quite straightforward, and well documented
in the YouTube / Google Help Center (www.google.com/support/youtube).
Just set up an account, get your video ready in a common format, and then upload
it.
Videos for YouTube need to be shorter than 10 minutes, smaller than 100 MB,
and in a common video file format, especially Windows Media (WMV), Windows AVI,
QuickTime MOV, and MPEG (MPG). YouTube recommends the MPEG-4 format at 320x240
resolution and with MP3 audio. If you're editing just for YouTube, there's no
need to save the clip at a higher resolution than it will be played back --
which also helps reduce the file size and upload time.
You can shoot and upload low-res videos from cell phones and digital cameras
(typically MPG), edit Web cam and standard-resolution videos with simple tools
like Apple iMovie (MOV) and Windows Movie Maker (WMV), or edit more
sophisticated videos from standard-def camcorders using desktop tools (i.e., in
DV AVI format) -- and then export them in a lower-res format for faster
uploading.
YouTube also offers the Web-based Remixer tool built on Adobe
Premiere Express for quickly editing or remixing videos already stored in
your account (www.youtube.com/ytremixer).
You can sequence and add footage, transitions, borders, captions, and audio.
To upload your video (after you've signed up for an account and are logged
in), click Upload Videos in the top right corner of any YouTube page. Enter
descriptive information to help users search for your content (Title,
Description, Tags, Category). Then browse for the video file and start it
uploading. The time required for the upload depends on the bandwidth of your
Internet connection. YouTube estimates uploads will take some 1 to 5 minutes per
MB over a high-speed Internet connection. After the upload is complete, YouTube
still needs to complete the conversion and processing of the video before it
appears online in your account under My Videos.
 My Videos
YouTube offers other upload options, including uploading videos directly from
a mobile phone by sending a MMS multimedia email to an address that you set up
in your account.
And, you don't even have to go though a separate upload process -- some new
versions of video editing tools have built Web uploading directly into the
application. For example, CyberLink PowerDirector 6 uploads to YouTube (www.cyberlink.com)
and Pinnacle Studio 11 publishes directly to Yahoo! Video (www.pinnaclesys.com).
Once your video is posted, you can share it as a single clip to YouTube, or
by creating a Playlist, or through subscriptions to a Channel that you define.
If you don't want the video to be globally accessible, you also can set it to be
Private and share it only with specific people on your contact list.
The easiest way to access a video posted on YouTube is by using the link to
the clip's page at the site. YouTube helpfully shows the URL to the page to the
right of the video window, ready to copy and paste into an email or to post as a
link on your own website.
The YouTube playback URL link looks like:
http://www.youtube.com/watch?v=a1b2c3d4e5z
Anyone then can use the link to jump to the YouTube site, with the clip
loaded in a player and displayed along with information about the clip,
including the nuber of times it has been viewed and other clips with similar
descriptions.
Even better, you can post the clip on your own site, as part of your own Web
page. Again, you can restrict the sharing options for the clip to specify that
you do not want the clip to be embedded on external sites.
Embedding does not require any special Web authoring magic. Along with the
page URL, YouTube also displays an Embed box with a chunk of HTML code to insert
the video player on your own page.
Just paste the code into your website or on your blog. The HTML code inserts
a Flash window on the page with your movie loaded for playback.
The YouTube Embed HTML code looks like:
<object width="425" height="350">
<param name="movie"
value="http://www.youtube.com/v/a1b2c3d4e5z"></param>
<param name="wmode" value="transparent"></param>
<embed src="http://www.youtube.com/v/a1b2c3d4e5z"
type="application/x-shockwave-flash"
wmode="transparent" width="425" height="350">
</embed></object>
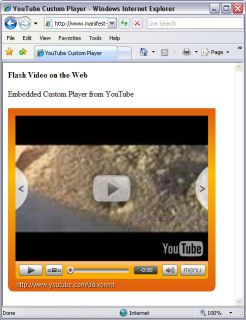
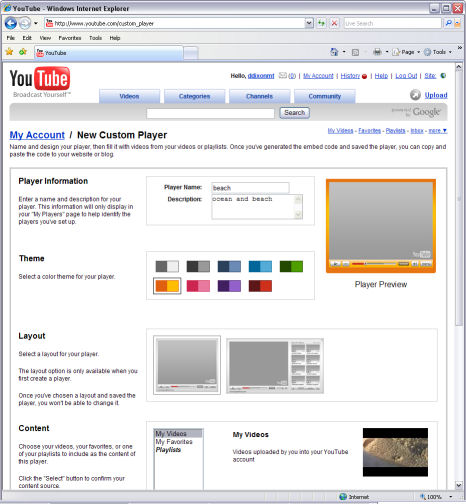
You also can customize the look of the player by selecting options under
Custom Players. Choose the layout and color scheme, and select a clip from your
videos, favorites, or playlists. This generates new HTML code to use on your
site. Any further changes to the settings for the custom player will be
automatically updated everywhere it is used -- without needing to edit the pages
again.
 Custom Players
The YouTube Custom Player HTML code looks like:
<object width='425' height='366'>
<param name='movie'
value='http://www.youtube.com/cp/a1b2c3d4e5z a1b2c3d4e5z='></param>
<param name='wmode' value='transparent'></params>
<embed src='http://www.youtube.com/cp/a1b2c3d4e5z a1b2c3d4e5z ='
type='application/x-shockwave-flash'
wmode='transparent' width='425' height='366'>
</embed></object>
Once you start taking advantage of streaming video, you can move on to
customize how your videos appear by doing the compression and embedding and
hosting yourself.


Be aware that Flash video actually uses two different video formats, the
older Sorenson Spark codec (up though Flash 7, www.sorensonmedia.com)
and the newer On2 VP6 codec (introduced with Flash Player 8, www.on2.com/technology/vp6).
Adobe recommends the newer VP6 as the preferred video codec for higher quality,
but the older Spark still works fine for sites like YouTube.
While exporting to Flash is not (yet) a common option for video editing
tools, some New conversion tools are starting to build in support for exporting
Flash video, including Sorenson Squeeze for Windows and Macintosh (www.sorensonmedia.com).
You also can export directly to Flash in Adobe Premiere Pro CS 3 (also
now for Windows and Mac, www.adobe.com/products/premiere).
The built-in Adobe Media Encoder provides presets for different formats
(including widescreen) and bitrates, and provides options for setting the Flash
codec and advanced settings. The result is a FLV file -- video and audio
compressed into a single file in Flash video format.

Premiere Pro - Flash Export
 Also,
if you're already working with the Flash professional authoring tool to create
Web animations and movies, Adobe Flash CS3 Professional has several
options for encoding clips to Flash video (www.adobe.com/products/flash).
There's the built-in Flash Video Import wizard, the stand-alone Flash 8 Video
Encoder, and the Flash Video QuickTime Export plug-in, which encodes into FLV
format when exporting from third-party video editing applications that support
the QuickTime exporter plug-ins. Also,
if you're already working with the Flash professional authoring tool to create
Web animations and movies, Adobe Flash CS3 Professional has several
options for encoding clips to Flash video (www.adobe.com/products/flash).
There's the built-in Flash Video Import wizard, the stand-alone Flash 8 Video
Encoder, and the Flash Video QuickTime Export plug-in, which encodes into FLV
format when exporting from third-party video editing applications that support
the QuickTime exporter plug-ins.
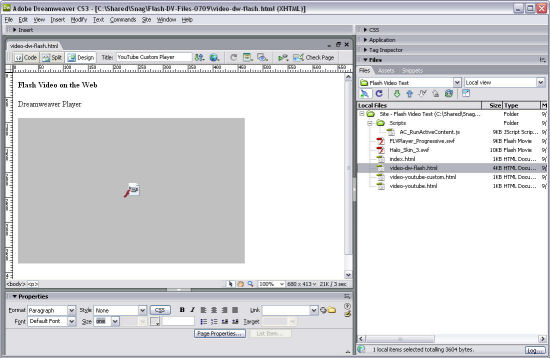
Then to play the video, the Adobe Dreamweaver CS3 Web design tool has
built-in support for embedding a Flash video clip (www.adobe.com/products/dreamweaver).
Under Insert > Media, choose Flash Video, and then select the options for the
player, including the look of the skin, and whether the clip automatically
starts playing (and rewinds at the end). There's also an option to insert code
to check whether the user's version of Flash is too old to play the video, and
offer to download the upgrade if needed.
Dreamweaver - Insert Flash
Video
The generated code references the Flash video clip as an external FLV file,
which may be hosted on your website, or on a separate media server. The other
option you need to specify when creating the Flash file is whether the video is
going to be delivered by Streaming, or by Progressive Download. True streaming
requires that the video be hosted on a Flash streaming server, which is required
for advanced interactivity and features. But you can host clips quite
satisfactorily on a plain old regular Web server, i.e., along with your website.
With progressive downloading, the Flash player works behind the scenes to
download and buffer the clip in order to provide a smooth playback experience --
even including seeking around quickly in smaller clips.
 Dreamweaver - Flash Player
When you insert a Flash clip, Dreamweaver generates the required HTML into
your Web page, and adds support files to your site, including the skin for the
player (SWF) and JavaScript code (JS).
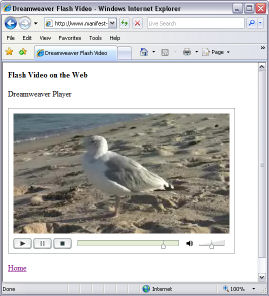
Then when you upload and open the page in a browser, the FLV file is
displayed in a nice video player, with play controls, a shuttle slider, and
volume control. Ta da!
As we have seen, getting started with streaming video is no longer a big
deal. It's wonderfully straightforward to quickly post your own clips on free
sites like YouTube, and share them around the globe. While you give up some
control over your work in the process, it's a great way to have fun and
experiment with very little hassle.
Even better, you can embed the clips right in pages on your own site, without
sending visitors off to another site, or requiring a separate player
application. However, the video player window is branded by YouTube, and may
show other material from YouTube.
You then can move on to preparing and hosting your own clips. Compress your
videos at different resolutions, and trade off options for better video quality.
Host the videos on your selected server -- a simple Web server, or a dedicated
Flash streaming server for longer clips. And embed the clips deeper into the
design of your own Web pages, using pre-defined players as in Dreamweaver, or
even with custom controls authored in Flash Professional.
So get out there, have fun, and start sharing your videos!
Top
 Find Adobe
Flash CS3 Professional on Amazon.com
Find Adobe
Flash CS3 Professional on Amazon.com
Portions originally published in Camcorder
& Computer Video magazine, 23, 6, December 2007.
|